MontyJ
Deeply Rooted
I have started an article on growing potatoes, but I just haven't had time to parse all of the data from the questionnaire I posted earlier. I will get it done, but life comes first. In the mean time, here is one that should help the timid canners at home:
Canning Green Beans at Home
If you have ever grown green beans, you know how prolific they can be. Most people end up with way more than they can eat in a short period of time. Bags and bags of these wonderful little producers are given away to friends and family every year. It's great to share the harvest, but it's also great to have a taste of summer during the long, cold days of winter! Fortunately, green beans are one of the easiest things to can at home.
For safety sake, please take some time to Read, understand and follow all of the instructions that came with your pressure cooker.
Now, let's get busy!
Equipment:
Here is what we will need:
Pressure canner (No, a water bath canner will NOT work)
Jars (pints or quarts)
Rings
Lids (new and unused only)
Canning funnel
Jar tongs
Measuring spoon
Icing spatula
Ladle
Large pans of boiling water
Paper towels
Cooling racks or towels
Ingredients:
Beans (about 2 pounds per quart)
Canning Salt (optional)
Bacon or ham (optional)
Red potatoes (optional)
As you can see, the only necessary ingredient are the beans themselves. We usually add potatoes and ham for that extra taste of the old days. If you prefer just the beans, simply omit adding the other ingredients; the process remains the same.
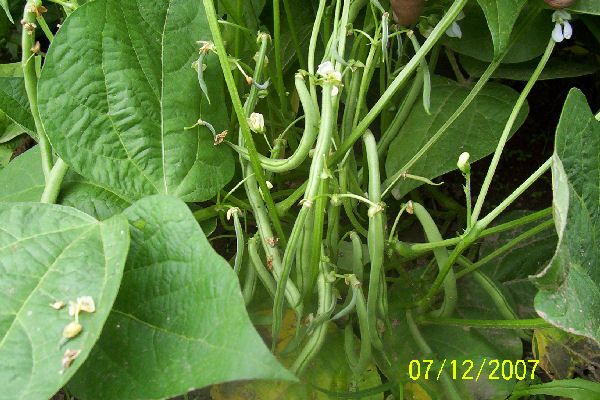
Selecting the beans:
This process works with just about any snap bean, be it green beans, yellow wax beans or Italian beans. Select only young, tender beans that are free of disease, rust, and pest damage. The pods should be full, but not bulging with seeds.

The process:
There are two methods of packing green beans, hot pack and cold pack. I will cover both methods here.
Step One:
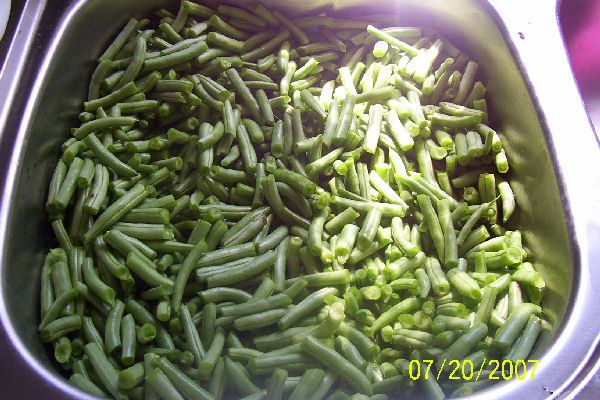
After the beans are picked and sorted (the bad ones removed), it's time for snapping. This is when growing a "string-less" bean really pays off! Snap or trim off the ends, then snap the beans into 1-1/2 inch pieces. If you have a large crop, try to enlist some help. This is a great way to spend quality time with the family! We usually sit around the picnic table in the shade and talk while snapping the beans. Since there is really no wrong way to do it, even young children can help. If you have a large crop, as we do, it pays to start early. You want to try to can the beans the same day they are picked. They will hold in the bottom of the refrigerator for a day or two, but the longer they sit, the softer they get. Don't forget to throw the trimmings into the compost bin!

Don’t they look excited?
Step two:
Wash the beans thoroughly. I like to wash mine in cool water no less than three times, changing the water each time. This is a good time to pick out any stem ends that accidentally got tossed into the bowl…believe me, it happens") The stem ends tend to float, so they are easy to find. Don't worry if you miss a few, they don't hurt anything.
The stem ends tend to float, so they are easy to find. Don't worry if you miss a few, they don't hurt anything.
Step three:
Wash and sterilize the jars, lids and rings. Since the pressure canning method kills most all bacteria, many people skip this step, but I just can't bring myself to do it. Since we will be adding boiling water to the jars, it is a good idea to place the sterilized jars into a warm oven (200 degrees) to keep them warm. Keep the lids and rings in a pan of hot water.
Step four:
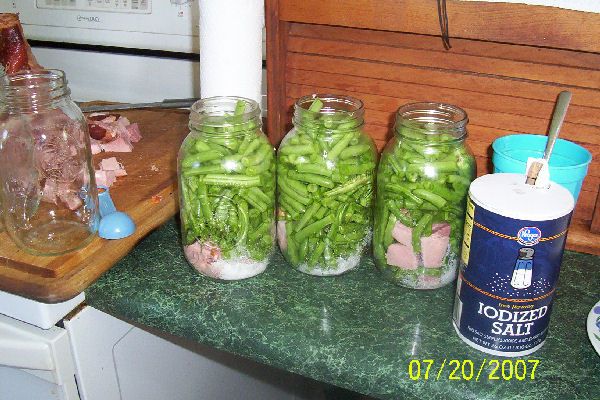
Prepare the jars:
Set up a canner load of jars at your "filling" station. Add one tablespoon of salt, and a piece of bacon or several small pieces of ham, and a few red potatoes to the jars. Remember, adding salt, ham/bacon, or potatoes is optional. Omitting them does not alter the processing method described below.
Step five:
Hot pack:
Place the beans in boiling water for five minutes. Fill the jars loosely leaving one inch of headspace. If you are new to canning, headspace is the distance between the top of the food and the rim of the jar. Headspace is important because as the jars are processed, the liquid expands. If the headspace is inadequate, the lids can bulge, food particles can become trapped under the seal, and the contents may spoil. Take the icing spatula and run it down the inside of the jars to release any air bubbles trapped inside. Finally, wipe the rim of the jar and adjust the lids and rings.
Raw pack:
Pack the jars tightly with raw beans. Add boiling water, leaving one inch of headspace. Take the icing spatula and run it down the inside of the jars to release any air bubbles trapped inside. Finally, wipe the rim of the jar and adjust the lids and rings.
Step six:
Place the filled jars into the pressure canner and process according to the times below:
Hot and Raw Pack:
DIAL GUAGE CANNER:
Pints: 20 minutes at 0-2000 ft. 11lb, 2001-4000 ft. 12 lb, 4001-6000 ft. 13 lb, 6001-8000ft. 14 lb
Quarts: 25 minutes at 0-2000 ft. 11lb, 2001-4000 ft. 12 lb, 4001-6000 ft. 13 lb, 6001-8000ft. 14 lb
WEIGHTED GAUGE CANNER:
Pints: 20 minutes at 0-1000 ft. 10 lbs; above 1000 ft 15 lbs
Quarts: 25 minutes at 0-1000 ft. 10 lbs; above 1000 ft. 15 lbs
Step seven:
After the pressure has reduced to zero in the canner, remove the jars and place them on the cooling racks or towels. Allow the jars to cool completely. During this time, you should hear the lids "popping". Remember, do not "help" the lids seal by pressing down on them. Let them seal on their own. Any jars that did not seal should not be reprocessed. They should be eaten or stored in the fridge for no more than a day or two.


Step eight:
Once the jars have cooled and sealed, remove the rings and store the jars in a cool dark place.
There you have it. Home canned beans. When the February wind is blowing, and spring seems so far away, open a jar of summer time and enjoy!
As always, if you have any questions regarding this, or any tutorial, please do not hesitate to ask!
MontyJ
TheEasyGarden.com Member
Canning Green Beans at Home
If you have ever grown green beans, you know how prolific they can be. Most people end up with way more than they can eat in a short period of time. Bags and bags of these wonderful little producers are given away to friends and family every year. It's great to share the harvest, but it's also great to have a taste of summer during the long, cold days of winter! Fortunately, green beans are one of the easiest things to can at home.
For safety sake, please take some time to Read, understand and follow all of the instructions that came with your pressure cooker.
Now, let's get busy!
Equipment:
Here is what we will need:
Pressure canner (No, a water bath canner will NOT work)
Jars (pints or quarts)
Rings
Lids (new and unused only)
Canning funnel
Jar tongs
Measuring spoon
Icing spatula
Ladle
Large pans of boiling water
Paper towels
Cooling racks or towels
Ingredients:
Beans (about 2 pounds per quart)
Canning Salt (optional)
Bacon or ham (optional)
Red potatoes (optional)
As you can see, the only necessary ingredient are the beans themselves. We usually add potatoes and ham for that extra taste of the old days. If you prefer just the beans, simply omit adding the other ingredients; the process remains the same.
Selecting the beans:
This process works with just about any snap bean, be it green beans, yellow wax beans or Italian beans. Select only young, tender beans that are free of disease, rust, and pest damage. The pods should be full, but not bulging with seeds.


The process:
There are two methods of packing green beans, hot pack and cold pack. I will cover both methods here.
Step One:
After the beans are picked and sorted (the bad ones removed), it's time for snapping. This is when growing a "string-less" bean really pays off! Snap or trim off the ends, then snap the beans into 1-1/2 inch pieces. If you have a large crop, try to enlist some help. This is a great way to spend quality time with the family! We usually sit around the picnic table in the shade and talk while snapping the beans. Since there is really no wrong way to do it, even young children can help. If you have a large crop, as we do, it pays to start early. You want to try to can the beans the same day they are picked. They will hold in the bottom of the refrigerator for a day or two, but the longer they sit, the softer they get. Don't forget to throw the trimmings into the compost bin!

Don’t they look excited?
Step two:
Wash the beans thoroughly. I like to wash mine in cool water no less than three times, changing the water each time. This is a good time to pick out any stem ends that accidentally got tossed into the bowl…believe me, it happens
The stem ends tend to float, so they are easy to find. Don't worry if you miss a few, they don't hurt anything.
Step three:
Wash and sterilize the jars, lids and rings. Since the pressure canning method kills most all bacteria, many people skip this step, but I just can't bring myself to do it. Since we will be adding boiling water to the jars, it is a good idea to place the sterilized jars into a warm oven (200 degrees) to keep them warm. Keep the lids and rings in a pan of hot water.
Step four:
Prepare the jars:
Set up a canner load of jars at your "filling" station. Add one tablespoon of salt, and a piece of bacon or several small pieces of ham, and a few red potatoes to the jars. Remember, adding salt, ham/bacon, or potatoes is optional. Omitting them does not alter the processing method described below.

Step five:
Hot pack:
Place the beans in boiling water for five minutes. Fill the jars loosely leaving one inch of headspace. If you are new to canning, headspace is the distance between the top of the food and the rim of the jar. Headspace is important because as the jars are processed, the liquid expands. If the headspace is inadequate, the lids can bulge, food particles can become trapped under the seal, and the contents may spoil. Take the icing spatula and run it down the inside of the jars to release any air bubbles trapped inside. Finally, wipe the rim of the jar and adjust the lids and rings.
Raw pack:
Pack the jars tightly with raw beans. Add boiling water, leaving one inch of headspace. Take the icing spatula and run it down the inside of the jars to release any air bubbles trapped inside. Finally, wipe the rim of the jar and adjust the lids and rings.
Step six:
Place the filled jars into the pressure canner and process according to the times below:
Hot and Raw Pack:
DIAL GUAGE CANNER:
Pints: 20 minutes at 0-2000 ft. 11lb, 2001-4000 ft. 12 lb, 4001-6000 ft. 13 lb, 6001-8000ft. 14 lb
Quarts: 25 minutes at 0-2000 ft. 11lb, 2001-4000 ft. 12 lb, 4001-6000 ft. 13 lb, 6001-8000ft. 14 lb
WEIGHTED GAUGE CANNER:
Pints: 20 minutes at 0-1000 ft. 10 lbs; above 1000 ft 15 lbs
Quarts: 25 minutes at 0-1000 ft. 10 lbs; above 1000 ft. 15 lbs
Step seven:
After the pressure has reduced to zero in the canner, remove the jars and place them on the cooling racks or towels. Allow the jars to cool completely. During this time, you should hear the lids "popping". Remember, do not "help" the lids seal by pressing down on them. Let them seal on their own. Any jars that did not seal should not be reprocessed. They should be eaten or stored in the fridge for no more than a day or two.


Step eight:
Once the jars have cooled and sealed, remove the rings and store the jars in a cool dark place.
There you have it. Home canned beans. When the February wind is blowing, and spring seems so far away, open a jar of summer time and enjoy!
As always, if you have any questions regarding this, or any tutorial, please do not hesitate to ask!
MontyJ
TheEasyGarden.com Member

 Good work!