New to starting plants from seed, could use some pointers

grow_my_own

Deeply Rooted
Joined
Aug 2, 2011
Messages
218
Reaction score
76
Points
133
Location
Zone 9a
I've been gardening off and on most of my adult life, and while some plants do well when you put the seeds directly into the ground, some plants do better when you use transplanted seedlings, which I have always purchased at nurseries, home improvement/gardening stores, from other gardeners and local farmers, etc. I have never started my own seedlings, but I've acquired an abundance of non-GMO, non-hybrid seeds this year and am hoping to propagate a number of my own seedlings.

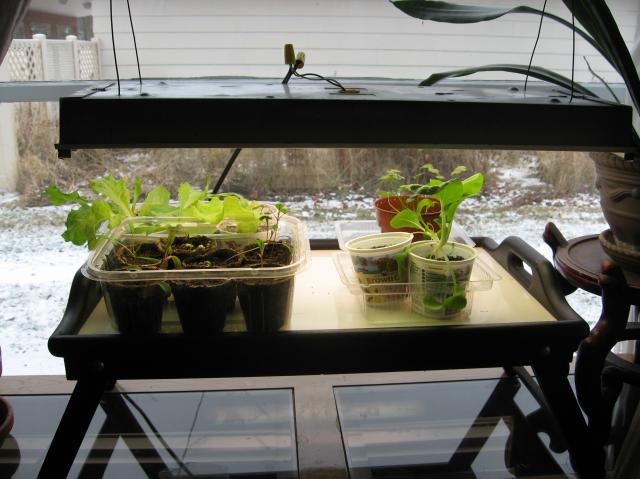
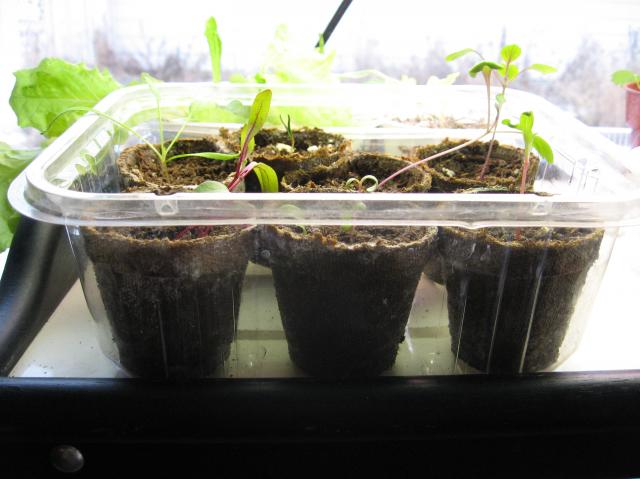
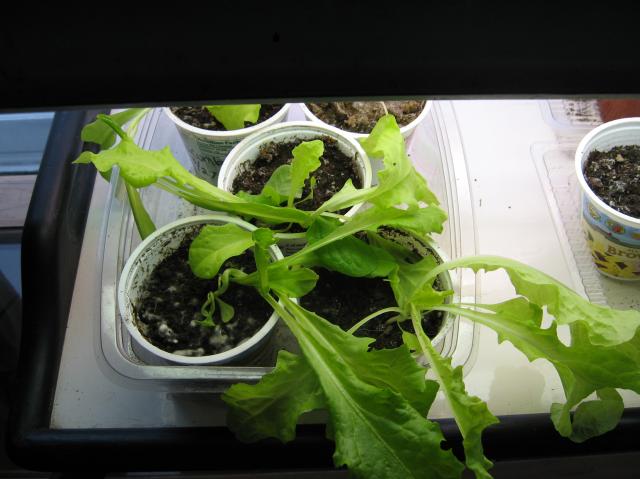
Rather than buying seed starter trays, I would like to use things I may already have around here. I've read where some people use egg cartons as starter trays but they are too shallow for certain plants' root systems. I have old disposable cups, and I've seen videos of people making their own starter cups out of everything from newspaper to toilet paper rolls. What "things I already have at home" types of seed starter cups have any of you personally used and recommend?

Do I have to use a grow light to start indoors?

One of the things we are making a priority in our gardening venture is to purchase as little as possible, use what we already have as much as possible, recycle as much as possible, etc.

I look forward to reading what others have used as home-made seed starting cups/trays.
 

NwMtGardener

Garden Addicted
Joined
May 30, 2011
Messages
1,839
Reaction score
873
Points
227
Location
Whitefish, MT
Hi there, welcome!! I started starting my own seeds just a few years ago, and its turned out to be easier than i thought! I dont know why I thought it was going to be hard, its not!!

I have used many different things to start my seeds. I think my favorite method involves those Jiffy pellet looking things that you rehydrate and they POP UP into little mesh enclosed seed starters. I think i have the best success at avoiding "damping off" problems by using those starters, and by watering my starts from the bottom as well. A key thing i've learned to watch for is any seedling getting narrow and spindly right at its base, sometimes they even tip over. This is the start of damping off, and you want to let the seedling and soil dry out as much as possible. Sometimes i'll still loose them but you can give them a fighting chance at making it if you keep them at that magic moisture level of "not too much/ not too little"!

I've also used peat shaped into pots, that i fill with sterile seed starter. Even if you want to use all recycled containers, i would buy sterile seed starter. There are ways you can make your own starter soil, and sterilize it in your oven, but i've never wanted the hassle of dealing with that!! With the small amount of stuff i start for my small backyard garden, i only used one tiny bag of seed starter in the past year. I've also used recycled yogurt cups, both to initially start in, and to do the first transplant to. I poke holes in the bottom of the cups so i can still water from the bottom.

Re: lights. Yes you will need them unless you're in a location where you get LOTS of sun! You dont need the super expensive grow lights set up, lots of us here use fluorescent shop lights, with the plant and aquarium label, or CFLs or even LEDs - there were recently a few other forum topic discussions re: lights.

Oh, almost forgot - you'll want to check the ideal soil temps for what you're starting. I use a strand of christmas lights underneath my containers for "warm soil" seeds - lettuce, tomatoes, i forget what else. They make expensive heat mats, but i like my christmas light method - but use a thermometer inside your growing domes - i've also gotten too many bulbs underneath the container and cooked my seeds! Whoops! I aim for between 70 - 85ish for my warm seeds. Things like cabbage, peas, onion, stuff that you would think about planting outside when the soil is still cold, i dont use any underneath heating for. BTW, i have a variety of "grow domes" that i use to keep my seeds in, to keep the humidity high - i have one of those jiffy kit things, but i also have lots of those clear plastic square tubs that they sell loose leaf lettuce in these days - they're perfect!! I just take the tops off a few days after all/most of the seeds sprout.

Have fun!!
 

NwMtGardener

Garden Addicted
Joined
May 30, 2011
Messages
1,839
Reaction score
873
Points
227
Location
Whitefish, MT
I've been meaning to get some pictures on here of my winter greens experiment, here they are!!

The little containers under the grow light (nice and close - want to keep them within a few inches, so make your light height adjustable!)
8229_img_0753.jpg


These are those peat cups, that I filled with sterile seed starter soil. You can plant them right into the garden, but they do inhibit the expansion of the roots, so when I'm transplanting them, I usually try and tear off most of the peat cup. At least the bottom.
8229_img_0755.jpg


What not to do - too much water, and I got mold and spindly lettuce! I"ll let these dry out good before the next watering, as always from the bottom. I do water with a nutrient solution, weak, once they start getting true leaves (more than 2).
8229_img_0754.jpg
 

grow_my_own

Deeply Rooted
Joined
Aug 2, 2011
Messages
218
Reaction score
76
Points
133
Location
Zone 9a
Yep, those are great. Thanks, but judging by your response and as I re-read my original question, I think I might have been a little vague in my original post.

I am looking for advice on using what I already have without having to buy a lot. I'm thinking reduce/reuse/recycle, trying to be as truly self-sufficient as possible. I don't want to buy Jiffy peat pellets or Jiffy peat pots or Jiffy anything, if I can at all help it! If that's the only way to start my own seeds, then that's what I'll have to do, I guess.

Besides that, one of the reasons we're growing our food is we have been slammed upside the head by the economy. If Internet wasn't included in my rent, surely I would not be in a position to even post here.

So I'm trying to not buy Jiffy stuff, which is why I posted this question.

By the way, I really do like your setup. :) It's really nice and may work for me next year. Just was looking for some advice from those who use what they already have without going out and buying a bunch of stuff.
 

catjac1975

Garden Master
Joined
Jul 22, 2010
Messages
8,961
Reaction score
8,933
Points
397
Location
Mattapoisett, Massachusetts
I have never had good luck with egg cartons and the like, though many people have. If you've purchased plants and have saved the plastic pots they can be recycled for years. I prefer the 6"X8" 6 pack cells. I notice the professionals are using the individual 6 packs the last few years and I'm not sure why. I do not have as much success with those. I have been raising my own transplants for 34 years starting in a west facing window. I soon graduated to a homemade greenhouse facing south. It has one south sided slanted window. All other walls and roof are well insulated so no heat has to be added to it. However the plants do tend to lean towards the light. I just turn them occasionally.

The most important thing for strong seedlings is bottom heat, which I use starting Feb or March. I currently have daylily seedlings filling my greenhouse which do not need bottom heat. You can start with one heat matt. They are not cheap but mine has lasted for so many years I've lost count. There are cheaper ones which I also have. I do not know how long they will last. I bought a large plastic matt last winter which I thought was a good buy, 18"X 10'. However it failed. The company offered to repair it, but I elected to just get a new part for it that they sent me. Have not tried it yet. For me the best for my money was the more expensive first heat matt that I bought. I think I paid $50.00 for it. It seems they run about $85.00 now if I remember correctly. Best buy for the money, but not cheap.

If you can afford your first one, once your plants are established you can keep changing the plants for new ones. Heat loving plants benefit the most from bottom heat, peppers, eggplant, tomatoes, curcubits and many flower starts.

Watch out for white fly and soil fungus.
I know you do not want to buy pots, however discount store often sell them for a pittance. I also used 12X18 inch waterproof trays which I buy online. Yes buy, but if you take care of them they will last many years. They hold the water and keep you from ruining your windowsill or whatever you place them on. I recycled
takeout food trays for this purpose also.
 

NwMtGardener

Garden Addicted
Joined
May 30, 2011
Messages
1,839
Reaction score
873
Points
227
Location
Whitefish, MT
Yeah, there are definitely lots of options to use ONLY what you have! But what happened to me, before I realized that it's very VERY helpful to use sterilized soil, is I got soil from my garden, and tried to start my seeds in it inside, and they all died!! My experience obviously wasn't that terrific, so I've adapted my techniques to buy minimal amounts of things, probably less than $20 a year, and now I don't loose hardly any plants.

And I'm sure you're going to get plenty of other responses from TEG members with lots more good tips that you can incorporate into your method! I remember someone here talking about making newspaper starter cups :)
 

catjac1975

Garden Master
Joined
Jul 22, 2010
Messages
8,961
Reaction score
8,933
Points
397
Location
Mattapoisett, Massachusetts
I use coir to start seedlings. It is sterile coconut husks. A small brick is under $3.00 and turns into a giant pot of planting material. I use the bales, $13.00, that turn into several gallons of planting material. I plant daylily seeds in it and I think I get close to 100% germination. We get it from Worm's Way as we have one not too far away. You can get it online very reasonably. Many sites compare the costs for you. Shipping can be free with some companies- shipping can make the cost prohibitive. I use it also to top off potting soil just to cover the seeds in other crops. One thing I do have to battle is soil fungus gnats. One solution that I have found for this is to soak the soil in a hydrogen peroxide and water mixture. I don't know if this is considered organic. Doesn't seem as if it would be. The gnats can ruin all of your hard work.
 

digitS'

Garden Master
Joined
Dec 13, 2007
Messages
25,825
Reaction score
29,108
Points
457
Location
border, ID/WA(!)
I start seed in cookie boxes or sandwich boxes - like, Heather has under her pots. Holes are punched in the bottom, they are filled with potting soil, spend a few hours in a basin of water, and then go on top the fridge. It is always about 70F up there.

Those seedlings have to be watched closely for when they emerge since they will stretch, searching for light. Within just a few hours, they will need to be moved to a large, south window in the house. The top of the cookie box can now be cut off and it serves as a tray for the box of soil & seedlings.

There is not always a lot of sunlight here during late winter. Also, there is a deciduous tree outside of that window - no leaves, so most of the sunlight comes thru. I have set up an 8' double fluorescent light fixture and that would help but I haven't done that the last few years.

The seedlings stay in that window until they are moved into a heated greenhouse, late in March. Really, they could stay there up until they can be moved outdoors for hardening-off but I will run out of room in the window.

I certainly advise you to purchase a good quality soil. You can make your own but it should be sterile. Like Heather suggests, using garden soil is just inviting problems.

In time, the plants will need to be moved from the cookie boxes and into something larger. I use 4-packs at that time but something like 12oz water bottles that have been cut to about 2" to 3" should work fine. Styrofoam or Dixie cups would probably work, also. Bottom watering right from the start, they don't see a sprinkler can or watering wand until they are about 6 weeks old.

Steve
 

lesa

Garden Master
Joined
Nov 10, 2008
Messages
6,645
Reaction score
568
Points
337
Location
ZONE 4 UPSTATE NY
I have tried all kinds of containers in my seed starting. The best I have found, is the bottom half of my half gallon milk containers. I just poke a few holes in the bottom. They don't dry out too fast and they are easy to tear away, when it is time to transplant. I would not recommend trying this experiment without lights and purchased dirt. Garden soil is just too dense for seedlings. A florescent bulb works great for me...Not sure where you are gardening, but I highly recommend trying cold frames for less delicate plants. No need to purchase anything- you can use hay bales, dresser drawers, old wooden boxes and old windows. Good luck! Let us know how you progress!
 

so lucky

Garden Master
Joined
Mar 5, 2011
Messages
8,342
Reaction score
4,956
Points
397
Location
SE Missouri, Zone 6
Make sure you have air movement around the growing seedlings. Maybe have a fan blowing on them from a distance. Simulates the breezes they will have once they get outside, and grows stronger stems.
You could probably re-use old potting soil if you sterilize it in the oven (microwave?)
Use bottoms of plastic milk or soda containers for pots.
Shop lights work, but you may have to buy a new bulb or two. Be sure you place the light close to the plants, or the plants close to the light. :)
 

Latest posts

Top