Adventures in Soil Blocking

Branching Out

Deeply Rooted
Joined
Dec 2, 2022
Messages
1,371
Reaction score
4,388
Points
175
Location
Southwestern B.C.
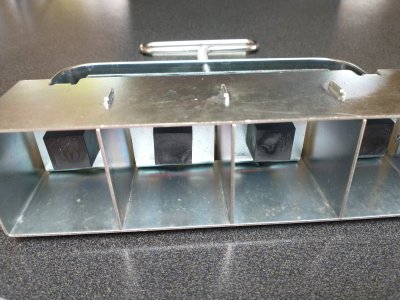
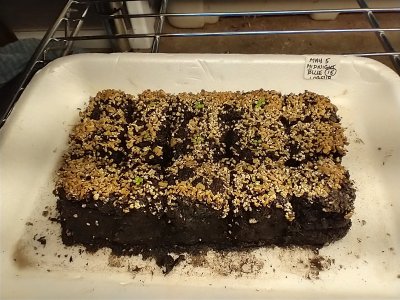
This spring I've been using Ladbrooke soil blocking tools to create compressed cubes of moist soil for starting seeds, and it has been a great experience. With the mini soil blocker it's possible to make tiny but still uniform blocks that are about the size of a sugar cube. These are perfect for starting small seeds like lettuce, tomatoes, peppers, or zinnias with very little cost as such a small quantity of soil is required. Having said that a small sack of seed starting mix is not inexpensive at $9 or so for about 5lbs. I've tried using potting soil instead, but most brands are full of rocks, sticks, or even large chunks of wood so I have to sift the mix before I can use it. This is time consuming, and I am not super impressed by paying for significant quantities of rocks and bark in a bag sold as potting soil .

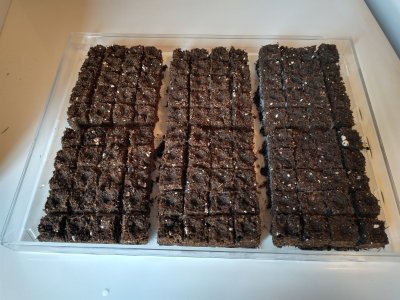
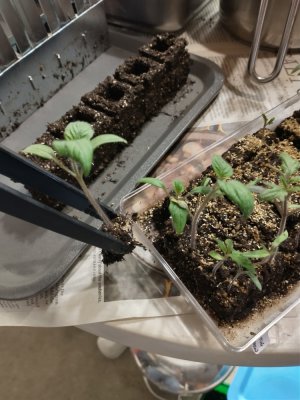
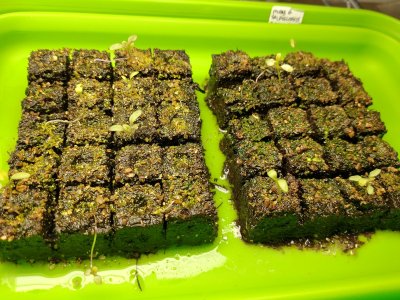
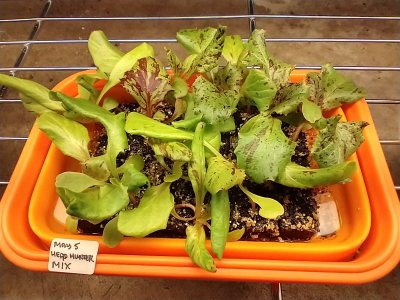
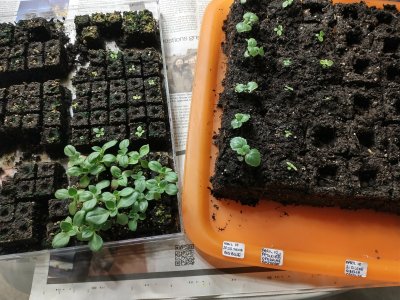
Not only that, but once the pebbles and bark are removed what you are left with looks suspiciously like peat moss with a handful of perlite thrown in. This got me wondering if I could make mini soil blocks using only sifted peat moss. Would they hold together? Would they retain too much moisture and rot the seeds? It seemed worth a go to find out, so on May 10th I gave it a try and started seeds of marigold Strawberry Blonde (loved that one when I grew it last year), zinnia Zahara Double Salmon, and basil Aromatto using only sifted peat moss and some dry organic fertilizer. It has been 12 days, and so far the results look promising. The photo on the left shows 14/25 marigolds, 10/27 zinnias, 20/28 Aromatto basil sprouts, and lastly some blocks made with a seed starting mix on the same day with 5/25 salvias popping up. I will definitely try peat moss blocks again to see if I can achieve consistent results with this method, and I may try increasing the ratio of peat in my large blocks as well. The large blocks use a lot more soil, but they are necessary for bumping up the seedlings after 2-3 weeks as shown in the photo on the right.
 

Attachments

  • IMG_20230522_133152757_HDR.jpg
    IMG_20230522_133152757_HDR.jpg
    306.4 KB · Views: 76
  • IMG_20230506_111458178_HDR.jpg
    IMG_20230506_111458178_HDR.jpg
    314 KB · Views: 67
Last edited:

Branching Out

Deeply Rooted
Joined
Dec 2, 2022
Messages
1,371
Reaction score
4,388
Points
175
Location
Southwestern B.C.
Someone mentioned that they make a whole bunch of soil blocks and freeze them until needed. What a great idea! A couple of weeks ago I was able to make three trays of 120 blocks each in less than half an hour, so now I have enough to last me for weeks. This tray just came out of the freezer and will take a few hours to thaw out; once it does I will sow more summer annuals like cosmos, marigolds and zinnias. I have also tried making extra of the large blocks and storing the tray in a plastic bag in the fridge for a week, which worked well too. Finding efficiencies like this for seed starting can be so helpful.
 

Attachments

  • IMG_20230522_140103308_HDR.jpg
    IMG_20230522_140103308_HDR.jpg
    246 KB · Views: 84

Branching Out

Deeply Rooted
Joined
Dec 2, 2022
Messages
1,371
Reaction score
4,388
Points
175
Location
Southwestern B.C.
I'm very curious about this. How do you 'bump up' the bigger seedlings? Do you toss them in the blocker and block around their roots?
For bumping up you begin by making a bunch of large blocks. The 2" blocker includes black plastic cube inserts that make a depression that is identical to the mini blocks, so you just pick up the mini block, pop it in the hole, and the roots find their way in to the large block. It is important to note that the blocks should be on the dry side when you go to move them, or they become little blobs of mud and fall apart. With soil block bumping up is kind of fun. I like that if only one or two seedlings germinate on a tray I can pick them out of the group, move them to a large block, and leave the remainder on the heat mat for germination. One video that I watched
suggested fashioning tongs made from tongue depressors to pick up the blocks, but I happened to find the perfect long plastic pinchers at a thrift store so that is what I like to use. A small butter knife is pretty good too-- but tongs work better if you are lifting a block out from the centre and not wishing to disturb the surrounding blocks.
 

Attachments

  • IMG_20230428_083510158_HDR.jpg
    IMG_20230428_083510158_HDR.jpg
    141.5 KB · Views: 65
  • IMG_20230522_145423474.jpg
    IMG_20230522_145423474.jpg
    205.3 KB · Views: 72
Last edited:

Branching Out

Deeply Rooted
Joined
Dec 2, 2022
Messages
1,371
Reaction score
4,388
Points
175
Location
Southwestern B.C.
Are the blocking tools expensive?
Yes, and no. I think the price is fair for the quality of the product. The tools are very well made of sturdy zinc coated steel and I think they would last a lifetime if well cared for. After you use them the dirt rinses off really easily with a hose, or by dipping it in a bucket of water and giving it a little swoosh. In Canada West Coast Seeds has them, or Lee Valley sells a combo pack of the mini and large 2" blocker for $100CAD-- which is a big investment. There is also a 1 1/2"one available through Epic Gardening in the U.S., and it is $43.00USD (West Coast Seeds indicates that they will have that one soon as well). I have all three and I use all three, each for a different purpose. If you do not want to have to bump up your starts after two weeks and are wishing to not invest too much money I would go with just the 1 1/2" blocker which makes 5 blocks at a time. It comes with little cream coloured dimple inserts that make a nice deep depression for your seed-- and the dimples are removable as well, if you prefer a solid block. This size would work well for growing lettuce, tomatoes, peppers, and flowers like nasturtiums, cerinthe, or sunflowers for about 3 weeks or so. After that you pop them in to a starter pot, or better yet plant them directly in the ground (chick peas, lettuce, and most flowers, if started at the right time in a large block, would go straight into the ground without bumping). Given that these blocks are large and use a lot more soil I would sow 2-3 tomato or pepper seeds per block if possible, to make sure you get one to germinate.

For starting a lot of small seeds like cosmos or basil for example, I prefer to begin with the tiny micro blocker and then bump up the ones that germinate to the 2" soil block--or you could certainly move the mini blocks to small starter pots if you do not wish to invest in the larger blocking tool. Some flower farmers even plant out the tiny blocks directly in the garden, but I have not had a lot of experience with this apart from Golden Flax, which did great with this method. The mini blocker makes 20 blocks at a time, and the cost is only about a penny per block. This year in particular I had really erratic germination on a couple of my trays of tomatoes and peppers; some are just sitting there for a month, and then sprouting. While I have been waiting for them to germinate these little blocks have taken up very little space in my living room, and then once they are up I am able to easily grab the little sprouted block and move it to a tray of larger soil blocks under lights (I recently figured out that it's handy to have extra large blocks ready and waiting to accommodate this). And if the seed doesn't germinate I have not invested a lot of money in potting soil. Funnily enough the biggest challenge with the mini blocker is when all 20 seeds sprout and need to be bumped up-- which suddenly takes up a LOT of space under lights.

The blocks are best watered from the bottom, so you also need trays with fairly high edges to hold the soil blocks. I picked up a bunch of cafeteria trays for a couple of dollars each at thrift stores and they are ideal for this. Empty clear acrylic Ferraro Rocher chocolate boxes are good too, and last for quite a long time. The blocks get watered once a day, preferably in the morning. And if you will be away for a few days there are little tricks that you can do to keep them from drying out as quickly.

There may be a cost saving with seed as well, as you only really need to place one seed per cell. It doesn't take long to figure out which seeds have excellent germination, and for those that germinate poorly you can put two seeds per cell the next time. I was wishing that I had done that with some of the tomato seeds that I ordered.
 
Last edited:

heirloomgal

Garden Addicted
Joined
Jan 17, 2021
Messages
3,610
Reaction score
11,608
Points
235
Location
Northern Ontario, Canada
Yes, and no. I think the price is fair for the quality of the product. The tools are very well made of sturdy zinc coated steel and I think they would last a lifetime if well cared for. After you use them the dirt rinses off really easily with a hose, or by dipping it in a bucket of water and giving it a little swoosh. In Canada West Coast Seeds has them, or Lee Valley sells a combo pack of the mini and large 2" blocker for $100CAD-- which is a big investment. There is also a 1 1/2"one available through Epic Gardening in the U.S., and it is $43.00USD (West Coast Seeds indicates that they will have that one soon as well). I have all three and I use all three, each for a different purpose. If you do not want to have to bump up your starts after two weeks and are wishing to not invest too much money I would go with just the 1 1/2" blocker which makes 5 blocks at a time. It comes with little cream coloured dimple inserts that make a nice deep depression for your seed-- and the dimples are removable as well, if you prefer a solid block. This size would work well for growing lettuce, tomatoes, peppers, and flowers like nasturtiums, cerinthe, or sunflowers for about 3 weeks or so. After that you pop them in to a starter pot, or better yet plant them directly in the ground (chick peas, lettuce, and most flowers, if started at the right time in a large block, would go straight into the ground without bumping). Given that these blocks are large and use a lot more soil I would sow 2-3 tomato or pepper seeds per block if possible, to make sure you get one to germinate.

For starting a lot of small seeds like cosmos or basil for example, I prefer to begin with the tiny micro blocker and then bump up the ones that germinate to the 2" soil block--or you could certainly move the mini blocks to small starter pots if you do not wish to invest in the larger blocking tool. Some flower farmers even plant out the tiny blocks directly in the garden, but I have not had a lot of experience with this apart from Golden Flax, which did great with this method. The mini blocker makes 20 blocks at a time, and the cost is only about a penny per block. This year in particular I had really erratic germination on a couple of my trays of tomatoes and peppers; some are just sitting there for a month, and then sprouting. While I have been waiting for them to germinate these little blocks have taken up very little space in my living room, and then once they are up I am able to easily grab the little sprouted block and move it to a tray of larger soil blocks under lights (I recently figured out that it's handy to have extra large blocks ready and waiting to accommodate this). And if the seed doesn't germinate I have not invested a lot of money in potting soil. Funnily enough the biggest challenge with the mini blocker is when all 20 seeds sprout and need to be bumped up-- which suddenly takes up a LOT of space under lights.

The blocks are best watered from the bottom, so you also need trays with fairly high edges to hold the soil blocks. I picked up a bunch of cafeteria trays for a couple of dollars each at thrift stores and they are ideal for this. Empty clear acrylic Ferraro Rocher chocolate boxes are good too, and last for quite a long time. The blocks get watered once a day, preferably in the morning. And if you will be away for a few days there are little tricks that you can do to keep them from drying out as quickly.

There may be a cost saving with seed as well, as you only really need to place one seed per cell. It doesn't take long to figure out which seeds have excellent germination, and for those that germinate poorly you can put two seeds per cell the next time. I was wishing that I had done that with some of the tomato seeds that I ordered.
Thank you! This may be the next step for me to take in seed starting. I love all the pictures you've posted, it's something I've always been curious to try but felt out of my depth.
 

Branching Out

Deeply Rooted
Joined
Dec 2, 2022
Messages
1,371
Reaction score
4,388
Points
175
Location
Southwestern B.C.
Soil blocks! I had no idea it even existed!
Lol. Exactly. Apparently this is how gardeners in Europe have been starting seeds for decades; we in north america are just a little late to the party. Mostly I find soil blocking to be a lot of fun, and relaxing.

Here are a couple of photos of small seeds that I started about 3 weeks ago. The white styrofoam tray holds lobelia seeds, which are very tiny and can take a while to germinate. If you get out your magnifying glass you will see green in the centre of several of the blocks. Lol. Having them in a soil block with a small footprint for the first 3-4 weeks is helpful for saving space under the lights. Small soil blocks are fairly easy to fashion free-form if you want to give it a shot (you really only need the soil blocking tool if you plan to make a lot, which I do; I tend to go a bit overboard where gardening is concerned). In this example I just used the last of my batch of blocking mix, and formed it into a flat brownie-like mass. Rather than using the mini-soil blocker I just cut 'squares' by pressing straight down with the flat bottom of a pancake turner (use your hand or something flat and straight to support the side when you do this, or the dirt will move sideways). You want to press down firmly; do not 'cut' with a sawing motion, or it breaks the blocks.

The green silicone tray has 2 x 20 1/2" blocks of Salpiglossis Grandiflora Mix, which is another slow starter that was sown almost three weeks ago. Not great germination, but it will be a snap to bump up the 10 that sprouted without any root disturbance as each little block is an island. I could sow 2-3 seeds per cell and thin, but from what I understand by thinning a seed mix I could inadvertently be culling some of the best colours; apparently the most intriguing flower shades will often be the slowest to germinate-- so culling is discouraged or you may eliminate them entirely.

And believe it or not on the orange silicone tray are 20 little seedlings of Frank Morton's 'Head Hunter Mix' lettuce sown on May 5th-- occupying a footprint of 3" x 3 1/2". You could easily hold them all in the palm of your hand. They are ready to either get planted out, or bumped up. We have no rain in the forecast so I will likely bump them up, and once their roots are well established I will share them with my friends for summer salads. Then I will start a few more varieties. See how easy this is?

Easy-- but with one reservation. If you bump up those 20 small lettuce seedlings they suddenly need much, much more space (see the last photo, with 20 each of two different varieties). Within a very short time you may find yourself up to your eyeballs in gorgeous plants and you will be making multiple trips to the store to buy more lights. So if you are easily captivated by starting seeds and growing amazing new plants a soil blocking tool may (or may not) be for you. 🤣
 

Attachments

  • IMG_20230524_075140343_HDR.jpg
    IMG_20230524_075140343_HDR.jpg
    269.5 KB · Views: 71
  • IMG_20230524_075116353_HDR.jpg
    IMG_20230524_075116353_HDR.jpg
    331.1 KB · Views: 77
  • IMG_20230524_075250607_HDR.jpg
    IMG_20230524_075250607_HDR.jpg
    236.5 KB · Views: 79
  • IMG_20230524_085528871_HDR.jpg
    IMG_20230524_085528871_HDR.jpg
    373.8 KB · Views: 71
Last edited:
Top