I am finally getting the construction description and pictures of the greenhouse we built posted.
A description of how we built it is below, and there are some photos of the details.
We built a greenhouse from an old ‘Costco’ garage tent. We have cold winters and hot, dry summers here and wind in the spring and fall. We wanted to build something that could withstand these conditions and would be low maintenance as well as low cost.
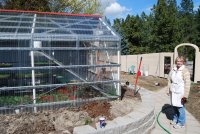
The tent had been sitting in our yard for twelve years. It measures 12’ x 20’ The framework was good, but the siding was unusable.
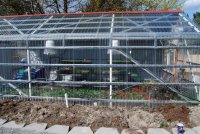
We leveled a horseshoe shaped area in a sunny spot in our yard which measured 28’ x 18’. We centered the framework into the horseshoe allowing for a 4’ outside bed once the siding had been added.
We put the vertical posts of the framework into 1 gallon buckets which we leveled, squared and filled with cement.
Using landscape blocks (any kind of block could be used) we built a wall around the perimeter of the leveled space 3’ high both inside and outside where the siding would be. That created a ditch which we filled with gravel then topsoil. This helped stabilize the vertical framing posts.
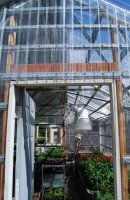
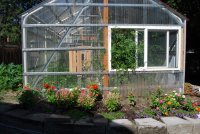
We had an old door and an old window from a remodeling project to use at the ends of the greenhouse. We used 2 by 4’s to frame the door. The door framing went all the way up to the gable of the framework. The window framing was only done on one side because the corner of the framework supported the other side. We framed a spot on the window side to attach the electric wiring which would be used for lighting and heat.
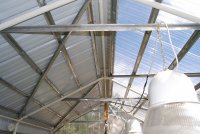
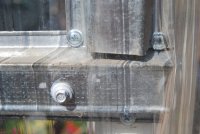
The framework is reinforced with ‘hat track’ and pan head screws. Hat track is an inexpensive framing material and is available at stores which carry drywall supplies. The pan screws are self tapping and this is important so that they will penetrate the steel framework . (We used 1/2” self tapping pan head screws which are available at Home Depot). The hat track is spaced horizontally in 2’ bands around the entire framework, including the gabled roof.
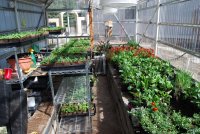
Once the framing was done, we bought sheets of corrugated UV acrylic siding and attached it to the hat track with roofing screws with washers attached (also available at Home Depot). The north side and half of the roof of the greenhouse was sided with some old corrugated steel siding that we had. (That worked okay for the side, but we have decided to remove the steel from the roof and replace it with the clear acrylic)
We framed out the door and the window and installed them. We found some lights for sale on Craigslist that had come out of a retail store that was closing and hung them from the inside framework.
It works well as a three season greenhouse. This morning it was 21 degrees outside, and inside the greenhouse it was 36!
 (Trying to think of a way to get one.........)

 It should be a year or two before it gets too small and needs enlarging.
") .)
.) Steve
Steve Thank you for taking the time to post the extra pics and instructions. That was very nice of you! I find the horseshoe bed around it most interesting. I live on a windy ridgeline and am wanting to build a greenhouse out of re-purposed house windows and sliding glass doors. I almost have enough now.
  Keeping the thing from blowing over is a real concern for me though. I really like your take on this! And it looks so nice with the landscaping around it. I'll have to show my DH your pics.